

Halloween is the perfect excuse to let kids get a little messy and a lot creative in the kitchen while making memories together. These simple and fun food crafts are designed with parents in mind—easy to set up, quick to clean up and guaranteed to bring big smiles. These are also perfect for Halloween-themed parties, they give kids a chance to get creative together while making spooky (and sweet) treats they’ll be excited to share.
1. Rice Crispy Treat Monsters
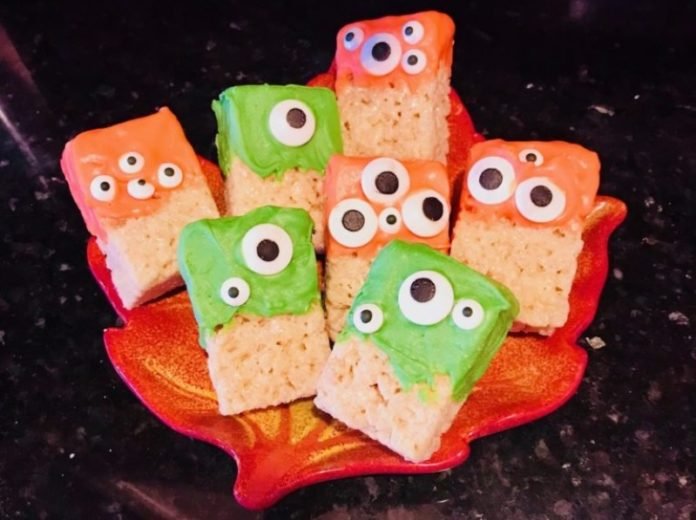
Candy Melts (I recommend Wilton brand. You can use any colors you like but I suggest orange & green for bright Halloween colors)
Candy Eyes (various sizes)
Olive Oil
Rice Krispies treats (homemade or store-bought)
Baking sheets lined with parchment paper
*For quick and mess-free melting, I recommend using a candy melting pot — it makes this recipe so much easier for kids to help with!
Directions:
- Prepare your Rice Krispies treats by cutting the homemade ones or unwrapping the store-bought ones.
- Melt the Candy Melts according to the package directions. Place each color in a separate bowl.
- Once Candy Melts have melted, add about 1/2 tsp of olive oil to each bowl and stir to blend (this will help keep the finished product smooth).
- Take each Rice Krispie Treat and dip one end into one of the melted Candy Melt mixtures. Scrape it on the sides of the bowl lightly to remove any excess melt off or take a spatula to smooth it out if you want a thicker finish on the bar. Place them on your parchment-lined baking sheets.
- While the Candy Melt is still wet, place the candy eyes on the treat in any pattern you desire. You can give them 1 big eye or 4 different-sized eyes!
- Allow them to sit at room temperature on baking sheets or approximately 45 minutes, or until they have hardened.
2. Ghost Pretzels
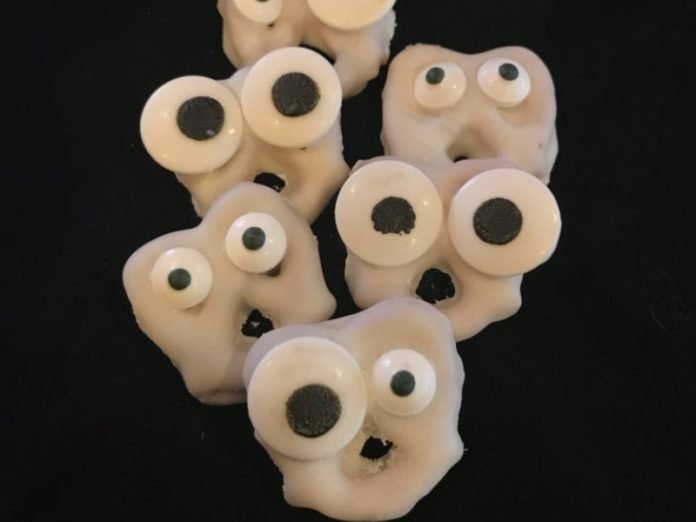
Vanilla Milk Chips/White Chocolate Chips
Snack Size Pretzels
Olive Oil
Baking sheets lined with parchment paper
Directions:
- Melt the vanilla milk chips either in a double boiler or the microwave (I recommend using a candy melting pot). Add 1/2 tsp of olive oil to the melted chips for a smooth consistency.
- Use a fork placed in one of the holes of the pretzel to dip it into the melted chips while they are still hot. Shake off excess chocolate while the pretzel is still on the fork and transfer it to a parchment-lined baking sheet.
- While each pretzel is still wet, place two candy eyes into the holes on top of each pretzel and gently press to secure.
- Work quickly so the melted chips stay at a warmer temperature, which makes them adhere to the pretzels. Allow the decorated pretzels to sit at room temperature on your baking sheet until they harden.
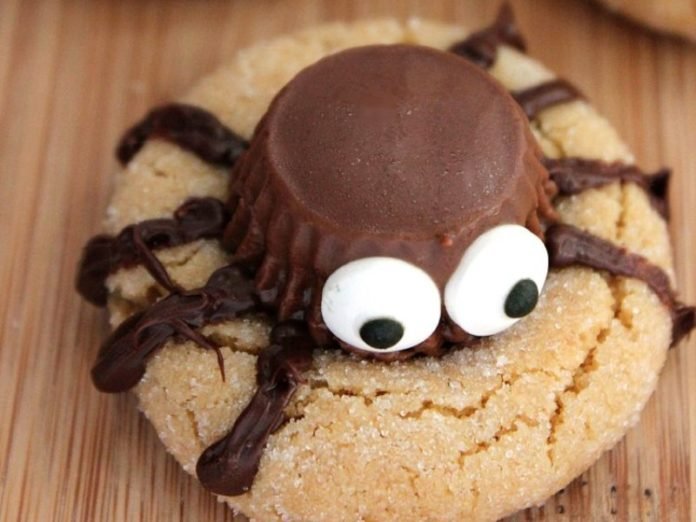
3. Peanut Butter Spider Cookies
1/2 cup Shortening (you can substitue equal parts butter or coconut oil)
1/2 cup Creamy Peanut Butter
1/2 cup Brown Sugar
1/2 cup Sugar
1 Egg
2 tbsp Milk
1 tsp Vanilla
1-3/4 cup Flour
1 tsp Baking Soda
1/2 tsp Salt
1/4 cup Sugar (For rolling)
48 miniature Reese’s Peanut Butter Cups, unwrapped and frozen
96 Candy Eyes
1/2 cup Chocolate Chips
Baking sheets lined with parchment paper
Directions:
- Preheat oven to 375 degrees
- In a large mixing bowl, beat together shortening, peanut butter, egg, brown sugar, vanilla and milk with an electric hand mixer.
- In a separate medium bowl, whisk together flour, baking soda and salt.
- Slowly add the dry mixture to the wet mixture and beat until well blended.
- Using an ice cream scoop, form dough into 1″ balls.
- Roll each ball in the rolling sugar and place them a couple of inches apart on an ungreased baking sheet.
- Bake 10-12 minutes or until golden brown.
- Immediately after pulling the cookie sheet out of the oven, gently press one frozen peanut butter cup, upside down, onto each cookie. Place cookies on a cooling rack.
- Place the cookies in the refrigerator for about 10 minutes to allow them to firm up.
- Melt the chocolate chips down until smooth in a candy melting pot or double boiler, allow metled chips to cool slightly. Once cooled slightly, place them as far into the corner of a sandwich baggie as you can. Cut a tiny tip off the corner of the bag. Pipe out eight legs on each spider cookie. You can also use piping bags with a small tip.
- Pipe some melted chocolate to the back of your candy eyes and gently, but firmly, press two eyes onto the front of a chocolate cup.
- Place in the refrigerator and allow it to set.
4. Halloween Marshmallow Pops
There are various styles of Marshmallow Pops you can make – Frankenstein, Pumpkins, Ghosts, etc. These are the recipes for Witches, Vampire Bats and Skeletons. We have made these every Halloween in our home for about 12 years – each year they are a massive hit!
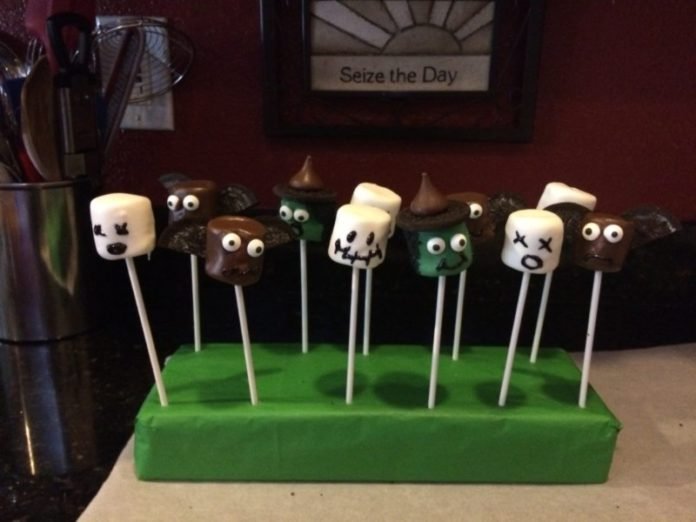
1 Pack of Large Marshmallows
Candy Melts (brown, green, white)
Gel Icing Pen (black)
Oreos (separated, with the frosting scraped off for the witches’ hat and bat wings)
Hershey’s Kisses (witch)
Chocolate Sprinkles (witch – place sprinkles in a shallow dish so you can easily roll marshmallow in after dipping into candy melts)
Styrofoam Bricks (you can find these in the floral area of a craft store) or a Cake Pop Stand for drying
Directions:
Prep all marshmallows by poking the cake pop sticks through the base. Ensure the stick extends almost to the top of the marshmallow.
Melt all the Candy Melts according to package directions, use a candy melting pot or double boiler.
Witch
- Stir the green melted Candy Melts until you achieve a smooth consistency.
- Dip a marshmallow in melted mixture and roll it around to evenly coat.
- Immediately add the witch’s hair by rolling about 2/3 of the marshmallow in a shallow dish with the chocolate sprinkles.
- Add the bottom of her hat by placing an half an Oreo cookie on top of the wet marshmallow.
- Put two candy eyeballs in place by sticking them directly to the melted candy.
- Take some of the melted brown Candy Melts and dab a little on top of the Oreo cookie. Place a Hershey’s Kiss on top to finish the witch’s hat.
- Set the pop in the Styrofoam brick or cake pop stand. Once dried, take the sparkle gel pen and paint a smile on her and maybe even a little wart!
Vampire Bat
- Grab the brown melted chocolate Candy Melts and stir it until smooth.
- Take your Oreo cookies (remember, they shouldn’t have any frosting in them) and cut them in half with a sharp knife.
- Lay them angled out and upwards on a baking sheet lined with parchment paper.
- Dip the marshmallow (already on the stick) almost all the way through in the chocolate and roll it around to coat it well. Allow excess chocolate to drip off.
- Place the coated marshmallow directly on top of the cut Oreo cookies, which are already laid out on the parchment paper, and gently press to secure them. They should look like the bat’s wings.
- Give the bat some eyeballs with your eye candy.
- Leave the bats, as is, on the Oreo cookies until they are set (about 20 minutes). Once they are set, you can add a fanged mouth with a Gel Icing Pen. I like to draw a straight line across and then use a toothpick to pull the corners of the mouths down to create the fangs.
Skeletons
- Melt the white Candy Melts and stir until a smooth consistency is achieved.
- Dip the marshmallow (already on the stick) into the melted chocolate and roll it until a smooth texture forms around the marshmallow.
- Place the stick end of the pop into the styrofoam brick or Cake Pop Stand until it hardens.
- Once completely dried, take the Gel Icing Pen and draw a face on him.
5. Mummy Oreo Truffles

1 Family-Sized Package of Oreos
1 Package (8 oz) of Cream Cheese, softened
1 Bag (12 oz) of White (or Vanilla Flavored) Chocolate Chips
Candy Eyes (Large)
Directions
- Place the entire package of Oreos in a food processor and pulse until they are finely ground into crumbs.
- Add the cream cheese to the crumbs and pulse until well combined. It will become smooth and combined with the cookie crumbs.
- Take an ice cream scoop and measure out one scoop into your hands. Roll it into a ball.
- Chill the balls in the freezer on a Baking sheet until they are set—about 30 minutes.
- Melt the white chocolate chips using a candy melting pot or double boiler. You can add a small amount of olive oil if you want for a better consistency and a glossier finish.
- Remove the truffles from the freezer and place one to two at a time into the bowl with the melted candy. Take two forks and roll the balls around until it is well-coated. Remove each ball by placing the 2 forks under it, lifting it and allowing the excess chocolate to drip off back into the bowl.
- Place the balls on a baking sheet lined with parchment paper and allow it to dry, about 20 minutes.
- Once the Oreo balls have dried, re-melt the remaining white chocolate and pour it into a small plastic zip baggie.
- Cut off a small tip on the corner of the baggie and pipe horizontal stripes around the Oreo ball. You can also use piping bags with a small tip. Lay chocolate in a way that it resembles a mummy’s wraps. Place two candy eyeballs in position and allow them to dry.
I hope these ideas make your Halloween just a little more sweet (and a lot more fun). They’re such a hit with kids, especially at parties, because they love showing off their spooky creations. And don’t forget to save this post (and share with your friends) so you’ve got it handy when you need a last-minute party or weekend fun idea! 🎃👻
👻 Party Supplies for Halloween
-
Treat bags or boxes (for kids to take their creations home or for handing your food creations out to neighbors, co-workers and friends)
-
Halloween-themed cake pop sticks (spooky designs)
-
Halloween-themed dessert stands (for serving snacks or holding candy)
Looking for more fall fun? Check these out:


 The Ultimate Guide to Fall Produce: How to pick it, store it and recipes to use it